Setting Up Keycloak Authentication in Angular 17 using Standalone Projects
If you've recently migrated to using standalone projects in Angular, you may have encountered some hurdles when setting up Keycloak authentication. The process might not be as straightforward as before, and attempting to copy-paste configurations from previous versions could lead to frustration and wasted time. In this guide, we'll walk through the updated steps for integrating Keycloak authentication seamlessly into your Angular standalone project. By the end, you'll have a clear understanding of how to implement Keycloak authentication efficiently, saving you time and effort in the process. Let's dive in!
Prerequisites
Before we begin, ensure that you have the following prerequisites installed:
Angular 17: This guide is tailored for Angular 17. If you're using a previous version, please note that you may need to look for compatible versions of libraries and dependencies.
Node.js 21: Make sure you a Node version that works Angular 17 or your Angular verison of choice. It's recommended to use Node Version Manager (NVM) for managing Node.js versions. If you haven't installed NVM yet, you can do so by following the instructions on the official GitHub repository: NVM GitHub.
Once NVM is installed, you can install Node.js 21 by running the following command:
nvm install 21Angular CLI: To install Angular CLI globally, use the following command:
npm install -g @angular/cli
Once you have these prerequisites installed, you can generate a new Angular project by running the following command in your terminal: ng new your-project-name
Setting Up Keycloak in Your Angular Project
To integrate Keycloak authentication into your Angular project, follow these steps:
1. Install Dependencies
First, install the required dependencies using npm:npm install keycloak-angular keycloak-js
Create Configuration File
Create a file named keycloak.config.ts in your project's source directory with the following content:
import { KeycloakConfig, KeycloakInitOptions } from 'keycloak-angular';

export const KC_CONFIG: KeycloakConfig = {
  url: '<url-to-your-keycloak-instance>',
  realm: '<realm-for-your-application>',
  clientId: '<client-id-of-the-client-for-your-application>'
};

export const KC_INIT_OPTIONS: KeycloakInitOptions = {
  onLoad: 'login-required',
};
Replace <url-to-your-keycloak-instance>, <realm-for-your-application>, and <client-id-of-the-client-for-your-application> with the appropriate values for your Keycloak instance.
Create Keycloak Initializer
Create another file named keycloak-initializer.ts in your project's source directory with the following content:
import { KeycloakService } from 'keycloak-angular';

export function initializeKeycloak(keycloak: KeycloakService): () => Promise<boolean> {
  return () => keycloak.init({
    config: KC_CONFIG,
    initOptions: KC_INIT_OPTIONS,
  });
}
4. Update App Configuration
Update your app.config.ts file to use the initialization of Keycloak. Ensure to import KeycloakAngularModule and HttpClientModule. Here's an example:
import { ApplicationConfig } from './models/application-config.model';
import { APP_INITIALIZER } from '@angular/core';
import { HttpClientModule } from '@angular/common/http';
import { importProvidersFrom } from 'import-providers';
import { KeycloakAngularModule, KeycloakService } from 'keycloak-angular';
import { initializeKeycloak } from './keycloak-initializer';

export const appConfig: ApplicationConfig = {
  providers: [
    importProvidersFrom(KeycloakAngularModule, HttpClientModule),
    KeycloakService,
    {
      provide: APP_INITIALIZER,
      useFactory: initializeKeycloak,
      multi: true,
      deps: [KeycloakService],
    },
  ]
}
You can also use provideHttpClient() but ensure that HttpClientModule is included, as it provides additional providers. In combination with KeycloakAngularModule, it automatically sends the retrieved access token on each request in the header.
Setting Up AuthGuard
To protect your Angular routes and ensure that only authenticated users can access certain parts of your application, you can set up an AuthGuard. The AuthGuard intercepts navigation to specific routes and determines whether the user is authenticated and authorized to access the requested route.
In Angular 17, functional guards are the default approach instead of class-defined guards. This means that you cannot extend KeycloakAuthGuard as outlined in the keycloak-angular documentation. However, replicating the functionality of KeycloakAuthGuard within a functional guard is straightforward and efficient:
import { CanActivateFn } from '@angular/router';
import { inject } from '@angular/core';
import { KeycloakService } from 'keycloak-angular';

export const authGuard: CanActivateFn = async (route, state) => {
  const keycloak: KeycloakService = inject(KeycloakService);

  // Check if the user is authenticated
  const isAuthenticated = keycloak.isLoggedIn();

  // Force the user to log in if currently unauthenticated.
  if (!isAuthenticated) {
    await keycloak.login({
      redirectUri: window.location.origin + state.url
    });
  }

  // Get the roles assigned to the user
  const roles = keycloak.getUserRoles(true);

  // Get the roles required from the route data
  const requiredRoles = route.data['roles'];

  // Allow the user to proceed if no additional roles are required to access the route.
  if (!Array.isArray(requiredRoles) || requiredRoles.length === 0) {
    return true;
  }

  // Allow the user to proceed if all the required roles are present.
  return requiredRoles.every((role) => roles.includes(role));
};
This custom AuthGuard function checks if the user is authenticated using Keycloak's isLoggedIn() method. If the user is not authenticated, it redirects them to the Keycloak login page and preserves the intended destination URL. It also checks if the user has the required roles to access the requested route (if any where specified in keycloak / app.routes.ts).
Configuring Keycloak Client
To ensure proper integration with your Angular application, make sure to configure your Keycloak client with the following settings:
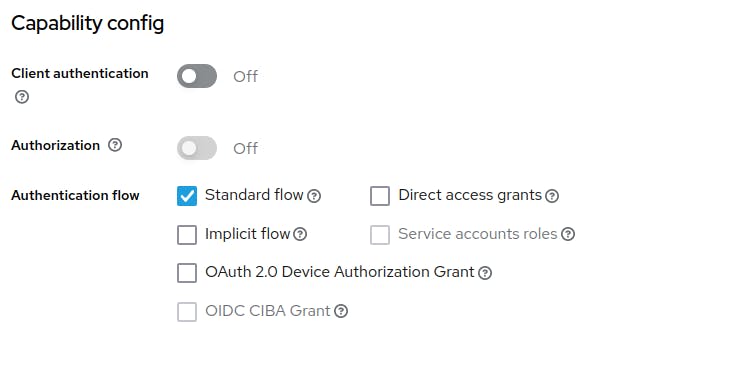
Access Type: Public: Set the access type of your Keycloak client for the frontend application to "public". In newer versions of Keycloak this configuration correspond to disabling the "Client Authentication" toggle. We disabled the 'Client authentication' since we are not trying to store the client secret in the code out of security reasons (since the Frontend code is running in the browser which can be accessed by everyone). It's also essential to use the "Standard Flow" for authentication.

